-
Three.js, WebXR - 2일차개발 블로그의 흔적/threeJS 2023. 1. 19. 00:31
취미로 공부하는 three.js 입니다.
예제 위주로 정리하고 있습니다.
https://github.com/dusunax/threeJS/wiki103 별 모양으로 별 그리기
Mesh
CircleBufferGeometry
반원
Shape
별 모양으로 별 그리기 (feat. 도형 그리기 기본 개념)
104 .glb .fbx 파일 Load하기
Material
material 종류
Free 3d.com
gltf-viewer
Loader
GLTFLoader
FBXLoader
new LoadingBar
new GLTFLoader, new FBXLoader
.Box3().setFromObject(~.scene)
.glb, tbx 각 로딩 결과
103 별 모양으로 별 그리기
별을 그리기 위해 필요한 값 innerRadius, outerRadius, inc, PI*2를 사용해서 별을 그립니다.
Shape과 Extrude에 대해서 간단히 알아봅니다.
일자: 2023년 1월 7일(토)
강의: 유데미 강의 링크
링크: [github wiki], [github page]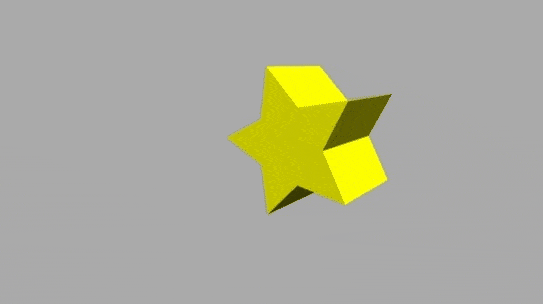
학습내용
- 코드를 사용하여 별을 그리는 방법에 대해 알아봅니다.
- shape을 만드는 법을 알아봅니다.
- Shape, moveTo, lineTo
- shape을 extrude해봅니다.
- ExtrudeBufferGeometry
오타 관련
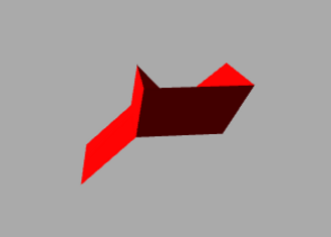
- 예상과 다르게 적용된 모습

- 코드 자동완성 때문에 sin()이 sign()으로 입력해서 오류가 생겼습니다.
자동완성과 오탈자에 주의해야 할 것 같습니다.

수학적 계산에 대해서
다른 GUI 기반 3D 그래픽 툴들과 달리, 계산해서 도형을 그린다는 것이
함수를 사용하여 엑셀 화면을 직접 그려보세요. 같은 느낌이 듭니다.
(매 번 도형을 그리기 위해 직접 계산하는 것은 어렵습니다.)
메소드와 속성에 대한 기본 개념을 이해하고 넘어간 다음 threeJS 에디터나 레퍼런스를 활용하고
필요하다면 블렌더로 가볍게 모델링 하는 것이 좋을 것 같습니다.
기록용 메모
scene 랜더 시 보이는 Object
- Mesh, Line Segments, Particles
- front face만 랜더됨
Mesh
- Geometry와 BufferGeometry
- BufferGeometry가 퍼포먼스가 좋음
CircleBufferGeometry
https://threejs.org/docs/index.html#api/en/geometries/CircleGeometry
const geometry = new THREE.BoxBufferGeometry();- CircleGeometry (radius : Float, segments : Integer, thetaStart : Float, thetaLength : Float)
- Radius: 반지름, 기본값 1
- Segment: 변 갯수, 최소 3, 기본값 32
- Start Angle(thetaStart): 시작 앵글, 기본값 0, (3시, x축, south)
- End Angle(thetaLength): central 각도(세타), 기본값 2*PI, 반원 만드려면 PI
반원
new THREE.CircleBufferGeometry(1, 32, 0, Math.PI);Shape
const shape = new THREE.Shape(); const outerRadius = 0.8;- Shape
- moveTo
- lineTo
별모양으로 별 그리기 (feat. 도형 그리기 기본 개념)
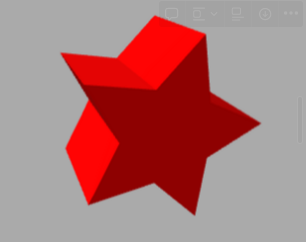
- innerRadius, outerRadius, inc, PI*2값 사용해서 for문 돌려서 별을 만들고, extrude세팅
const shape = new THREE.Shape(); // 도형이다. const outerRadius = 0.8; // 안쪽 원의 반지름 point const innerRadius = 0.4; // 바깥쪽 원의 반지름 point const fullDeg = Math.PI * 2; // 360deg const inc = fullDeg / 10; // 점 10번 찍을 것 shape.moveTo(outerRadius, 0); // 바깥족 원 0 위치에서 시작합니다. let inner = true; // 이동할 위치의 원 종류 // 한 번 돌아갈 각도, 360도가 될 때까지 돌림, +=한 번 각도 for (let theta = inc; theta < fullDeg; theta += inc) { const radius = inner ? innerRadius : outerRadius; // 번갈아서 찍을 것이다. shape.lineTo(Math.cos(theta) * radius, Math.sin(theta) * radius); // 이 부분은 수학임 // shape.lineTo(시작 위치, 끝 위치) inner = !inner; // 원 종류 토글 } const extrudeSettings = { steps: 1, // 한 번 extrue depth: 1, // extrue할 길이 bevelEnabled: false, // bevel 안 함. }; const geometry = new THREE.ExtrudeBufferGeometry(shape, extrudeSettings);- …?
- 됐음! ⇒ 자동완성 때문에 sin()이 sign()이 된 오타 때문
- 기존 3D 툴들(블랜더나 3ds, 스케치업, 라이노)와 다르게 계산해서 그리는 도형… 이라는 것이 함수를 사용해서 엑셀 화면을 직접 그려보세요. 같은 느낌이다. 직접 계산은 어려울 것 같다. 기본 개념을 이해하고 넘어간 다음 threeJS 에디터나 레퍼런스를 참고하고 필요하다면 블랜더로 가볍게 작업해도 내가 원할만한 모델링은 충분히 가능하지 않을까?
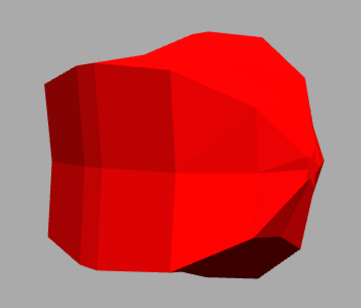
- extrude, step 3의 bevel 줬을 때의 모습..? bevel 적용되는 게 다른 툴과 다른 것 같다. 또한 shape을 닫아주는 것이 “없거나, 혹은 필수가 아닌 점”(아직 모름..)이 다른 것 같다.
104 glb, fbx 파일 Load 하기
일자: 2023년 1월 7일(토)
강의: 유데미 강의 링크
링크: [github wiki], [github page]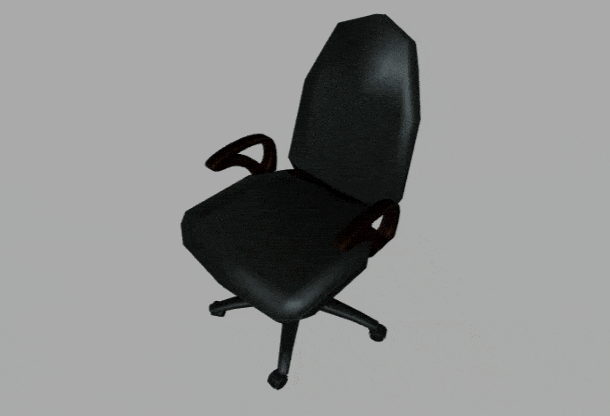
학습내용
- Metarial에 대해 간단하게 알아봅니다.
- Loader에 대해 알아봅니다.
- setPath(), load(), scene.add()
- glb, fbx 확장자의 파일을 로드합니다.
Material
material 종류
mesh material 랜더 MeshBasicMaterial 컬러 MeshLambertMaterial 컬러 + 그림자 MeshPhongMaterial 컬러 + 그림자 + 빛 MeshStandardMaterial 복합 Free 3d.com
- threeJS에서 쓰기 좋은 파일 포맷 ⇒ .glb
- glTF의 바이너리 버전
- 이후에 블렌더에서 glb로 export하여 사용할 것임
gltf-viewer donmccurdy
- .glb 파일을 브라우저에서 쉽게 확인할 수 있는 viewer입니다.
Loader
- 로더를 import합니다.
import import { GLTFLoader } from "../../libs/three/jsm/GLTFLoader.js";
import { FBXLoader } from "../../libs/three/jsm/FBXLoader.js";
GLTFLoader
- https://threejs.org/docs/index.html?q=GLTF#examples/en/loaders/GLTFLoader
- GLTFLoader.load ( url : String, onLoad : Function, onProgress : Function, onError : Function ) : undefined
- url : .gltf 또는 .glb 파일의 위치 (setPath를 따로 설정했다면 그냥 파일 이름임)
- onLoad : 콜백
- onProgress: 진행 중 콜백
- onErorr: 에러 시 콜백
FBXLoader
- 파라미터 ⇒ GLTFLoader와 동일
new LoadingBar
this.LoadingBar = new LoadingBar(); this.loadGLTF(); ... loadGLTF(){ const self = this; const loader = new GLTFLoader().setPath("../../assets") }- this.LoadingBar = new LoadingBar();

new GLTFLoader, new FBXLoader 그리고 loader.load()
- 새 loader를 만듭니다.
- setPath를 사용해 경로를 지정합니다.
- loader.load 메소드로 glb 파일을 로드합니다.
- loader.load(파일, 완료콜백, 진행중콜백, 에러콜백)
loadGLTF() {
  const self = this; // self는 this
  const loader = **new GLTFLoader().setPath("../../assets/glb/");**

  loader.load(
    "office-chair.glb", // 파일명, path를 지정하지 않았다면 전체 경로
    function (gltf) { // gltf를 받아옴
      self.chair = gltf.scene; // chair는 scene
      self.scene.add(gltf.scene); // self(this)의 scene에 완료된 scene을 add
      self.loadingBar.visible = false; // 로딩바는 감춤
      self.renderer.setAnimationLoop(self.render.bind(self));
			// renderer에 animation loop, this.render.bind(this)
    },
    function (xhr) { // XML http request 객체를 받아옴
      self.loadingBar.progress = xhr.loaded / xhr.total;
			// xhr.loaded(로딩 지수) / xhr.total(전체)
    },
    function (err) {
      console.log("에러 발생");
      console.log(err);
    }
  );
}
loadFBX() { const self = this; const loader = new FBXLoader().setPath("../../assets/model/"); loader.load( "office-chair.fbx", function (object) { self.chair = object; self.scene.add(object); self.loadingBar.visible = false; self.renderer.setAnimationLoop(self.render.bind(self)); }, function (xhr) { self.loadingBar.progress = xhr.loaded / xhr.total; }, function (err) { console.log("에러 발생"); console.log(err); } ); }
.Box3().setFromObject(~.scene)
- 영역의 bounding box 사이즈(스케일) 확인하기
- .Box3().setFromObject(영역)
- vector3ToString()
const bbox = new THREE.Box3().setFromObject(gltf.scene); console.log( `min: ${"\n" + vector3ToString(bbox.min, 2).split(",").join("\n")}` ); console.log( `max: ${"\n" + vector3ToString(bbox.max, 2).split(",").join("\n")}` ); - console 출력 내용
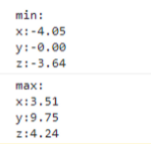
- 만약 1000, 10000 등 예외적인 숫자가 있다면 object의 스케일 또는 위치를 조정해야 함을 알 수 있음
.glb, .tbx 각 로딩 결과
- gib 파일 : GLTF 로더 사용
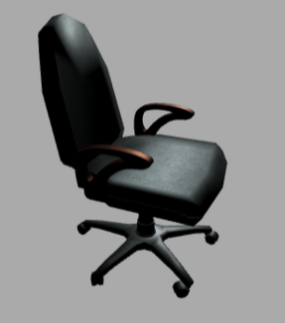
- fbx 파일 : FBX 로더 사용
 반응형
반응형'개발 블로그의 흔적 > threeJS' 카테고리의 다른 글
Three.js, WebXR - 3일차 (0) 2023.01.22 Three.js, WebXR - 1일차 (0) 2023.01.16